Nadine
Tuesday, June 16, 2009
New Blog Address
Ok Bloglanders...It's official! My Blog has just joined the Mother Ship and has a new address. Here's the link. Come on over for a visit...See y'all soon!
Monday, June 15, 2009
It's Coming Soon!
Yahoo! The living and breathing Willow Creek Quilts website is about to launch in just a few days. My apologies to you if the link from here is temporarily down. It's all part of the birthing process! Once the site is up the link will work again and hopefully we won't have too many labor and delivery issues! Thank you in advance for your patience.
This is exciting!
Chat with y'all soon!
Nadine
Sunday, June 14, 2009
A Binding Tutorial with "The Binding Gizmo"
 Someone suggested I share one of my favorite tools, "The Binding Gizmo" by writing a Tutorial. This tool was shown to me a few years ago by Thea Jirak, the gal who designed it. I was in strong like with it from the moment she demo-ed it. WOW! The idea of having a binding turn out perfect everytime with no scrunched or gaping closures was ever so appealing to me. Now many, many, many quilts, table runners, placemats and demonstrations later it is still my favorite tool...well, really my Bernina is first and then my rotary cutter,mat, ruler & thimble are next...but then "The Binding Gizmo" is Primo!
So, here we go. "The Binding Gizmo" tool is the clear acrylic piece that comes with the spiral booklet you see next to the tool. Thea did a fantastic job giving you 26 pages of great information about binding fabric requirements & how to cut straight & bias binding in a way that gives you the longest strips. The booklet is filled with step-by-step instructions that gives you a fantastic visual presentation.
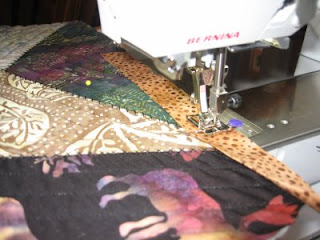
Once you've prepped your binding (I usually use 2 1/2" wide bias strips that are pressed to 1 1/4" and then roll them "jelly roll" fashion and stick the roll in a sandwich bag to keep it from unrolling), lay it on your quilt edge, matching its raw edges with the quilt's raw edges. Next, lay the Gizmo on top, lining up its dark line with the end of the binding. Put a pin through the binding and the quilt at the end of the Gizmo....notice the purple flower pin at the left side of the Gizmo. The pin marks where you'll start sewing the binding to the quilt. Now with a pencil, mark the binding in the slot that corresponds to the width of your binding. (She has several slots for different sizes)
 Next, using the Gizmo ruler, measure 3" above the end of the binding and put another pin to mark the spot where you'll stop sewing after you've attached the binding all the way around the quilt.
 Here's the "jelly roll" of binding all rolled up and kept under control in a sandwich bag.
 Time to sew! Begin stitching at the first purple flower pin. (I like a 3/8" seam allowance so that my binded edge is full and not hollow feeling)
 Here's my bagged binding on the floor coming out of the little zip locked opening.
 Here I've sewn all around the quilt and I've arrived at that second purple flower pin...the stopping spot.
 Time to take the quilt away from the machine and re-measure & mark for the closure. Lay the binding you just were sewing on top of the beginning section. By pulling the starting end out a little from the edge of the quilt you can once again lay the Gizmo on top, lining up the dark line with that sticking out end. Now mark the top binding section in the correct slot.
 Now, open up the ending section, right side up. I've put a pin on the line I made through the slot.
 Open up the beginning section of the binding and place it face down to the right of your last drawn line...or on the side closest to the quilt using a right angle. (Sorry I used batiks in the photo!) You'll sew a diagonal seam joining these 2 sections together...the seam will be parallel to the edge of the quilt...the same direction as the white marking pencil.
 Another view:

 Once sewn I like to let it lie back in position to make sure everything rests where it should.
 Time to trim the seam. I trim it to 1/2" so that the bulk is distributed nicely.
 Press open the seam.
 Voila! Time to finish attaching the perfectly closed binding. You too will love this tool!
 One other helpful hint: Whether I'm doing square or rounded corners, I always press my binding open on the front side to help it turn nicely to the back. I also always "make-up" all the corners, press them and then pop some binding clips on them before I ever start hand stitching the binding in place. I find that when I do this, the corners are nicely "pressed" in position when I get to them to sew and it makes fiddling with the corners effortless.
 Hope someone finds this helpful.
 Next, using the Gizmo ruler, measure 3" above the end of the binding and put another pin to mark the spot where you'll stop sewing after you've attached the binding all the way around the quilt.
 Here's the "jelly roll" of binding all rolled up and kept under control in a sandwich bag.
 Time to sew! Begin stitching at the first purple flower pin. (I like a 3/8" seam allowance so that my binded edge is full and not hollow feeling)
 Here's my bagged binding on the floor coming out of the little zip locked opening.
 Here I've sewn all around the quilt and I've arrived at that second purple flower pin...the stopping spot.
 Time to take the quilt away from the machine and re-measure & mark for the closure. Lay the binding you just were sewing on top of the beginning section. By pulling the starting end out a little from the edge of the quilt you can once again lay the Gizmo on top, lining up the dark line with that sticking out end. Now mark the top binding section in the correct slot.
 Now, open up the ending section, right side up. I've put a pin on the line I made through the slot.
 Open up the beginning section of the binding and place it face down to the right of your last drawn line...or on the side closest to the quilt using a right angle. (Sorry I used batiks in the photo!) You'll sew a diagonal seam joining these 2 sections together...the seam will be parallel to the edge of the quilt...the same direction as the white marking pencil.
 Another view:
 Once sewn I like to let it lie back in position to make sure everything rests where it should.
 Time to trim the seam. I trim it to 1/2" so that the bulk is distributed nicely.
 Press open the seam.
 Voila! Time to finish attaching the perfectly closed binding. You too will love this tool!
 One other helpful hint: Whether I'm doing square or rounded corners, I always press my binding open on the front side to help it turn nicely to the back. I also always "make-up" all the corners, press them and then pop some binding clips on them before I ever start hand stitching the binding in place. I find that when I do this, the corners are nicely "pressed" in position when I get to them to sew and it makes fiddling with the corners effortless.
 Hope someone finds this helpful.
Now I really do have to go clear some flat surfaces!! Happy stitchin' for the soul!
Nadine
New Color! New Pattern! June?
Almost 2 weeks & 3 Dr. visits later & it's still "a wrap" but in a new color! They say it's finally healing after a horrific strept infection...hopefully it will have an unveiling next Friday. I'm ready for it to be normal again. I don't just "sit" and watch TV very well. I'm really missing my evening hand stitching time so during TV baseball games I'm cleaning out a boat load of magazines. I subscribe to several and enjoy them for a along time but there does come a time when they begin to take over! I need to find those ever elusive cleared "flat surfaces" again!
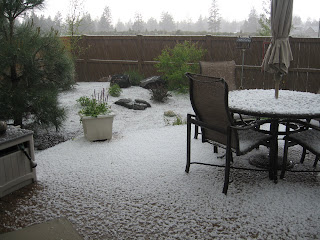
 Look at this mess that landed on our deck last Tuesday, 6/9! We ended up with 2" of 1/2" size hail that attacked everything green with a vengence...poor tomatoes, squash, beans, peppers and everything floral and leafed. Such a mess and so very sad. Downtown Bend ended up with about 4" of the stuff and caused a lot of flooded streets and traffic jams...yeah, JUNE!
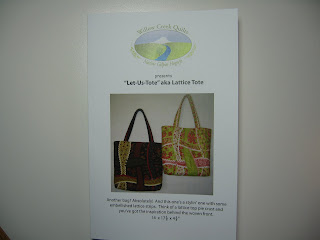
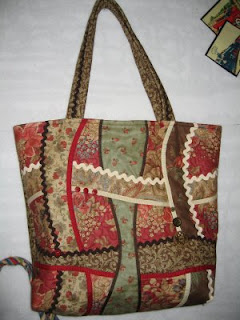
 At last the "Let-Us-Tote" aka Lattice Tote pattern came back from the printer and made its debut at Sew Many Quilts, a great shop here in Bend.
 Gotta run for now...those "not-so-cleared flat surfaces" are begging me to help them out so I can focus on a new baby quilt pattern....Sweet baby girl will be here in just a few weeks! Have a great day stitchin' for your soul.
 Look at this mess that landed on our deck last Tuesday, 6/9! We ended up with 2" of 1/2" size hail that attacked everything green with a vengence...poor tomatoes, squash, beans, peppers and everything floral and leafed. Such a mess and so very sad. Downtown Bend ended up with about 4" of the stuff and caused a lot of flooded streets and traffic jams...yeah, JUNE!
 At last the "Let-Us-Tote" aka Lattice Tote pattern came back from the printer and made its debut at Sew Many Quilts, a great shop here in Bend.
 Gotta run for now...those "not-so-cleared flat surfaces" are begging me to help them out so I can focus on a new baby quilt pattern....Sweet baby girl will be here in just a few weeks! Have a great day stitchin' for your soul.
Nadine
Wednesday, June 3, 2009
Issues? A Big Owie!
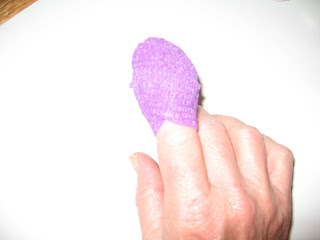
How did it happen? When did you do it? You did what? Now, I ask you...how many of you have ever stuck yourself with a pin/needle while stitching? I do it nightly when I'm hand stitching. Papa Toad's always commenting..."Got yourself again?" So yesterday when I saw my doctor with my obviously infected finger and she asked the data questions, my answer was...."maybe Saturday or Sunday". I just knew that by Sunday night my finger was a little tender like when you have a splinter so I just picked up another pin and tried to poke it and squeeze! Ok, call that stupid but it'd always worked before! By Monday morning it blew up and I called to see the doctor on Tuesday. Oh yeah, and I had a fever and by night I could feel every heart throb. By the time I arrived at her office I had red lines running to my armpit. Dr. B took one look and said "I do NOT like that....I'm sending you NOW to the hand surgeon." Ok then, I guess this is serious. Two hours later I had my new numb purple finger and sat at my Safeway Pharmacy with my iced mocha waiting for my antibiotic.
 This morning the numbness is finally gone, I think the redlines are nearly gone and I'll wait for the culture results to see if I'm on the right antibiotic. Medicine is awesome...so is God! Yes, I'm right handed so for now I guess I'll get a lot of machine work & designing done. Meanwhile y'all be careful out there!
I did finish 3 more totes up last week while I was proofing my new pattern "Let-Us-Tote aka Lattice Tote". I'm picking the patterns up from the printer today. Yahoo!
Moda's "Portobella Market" line:
 Moda's "Objects of Desire" line:
 Moda's "Charisma" line:
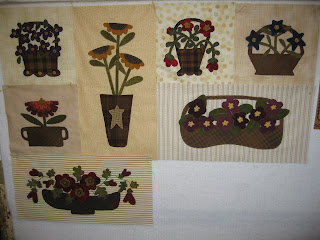
 And I'm current with Karen's BOM. I love working with wool!
 Ok friends...have a Happy Wednesday and watch those pins!
 This morning the numbness is finally gone, I think the redlines are nearly gone and I'll wait for the culture results to see if I'm on the right antibiotic. Medicine is awesome...so is God! Yes, I'm right handed so for now I guess I'll get a lot of machine work & designing done. Meanwhile y'all be careful out there!
I did finish 3 more totes up last week while I was proofing my new pattern "Let-Us-Tote aka Lattice Tote". I'm picking the patterns up from the printer today. Yahoo!
Moda's "Portobella Market" line:
 Moda's "Objects of Desire" line:
 Moda's "Charisma" line:
 And I'm current with Karen's BOM. I love working with wool!
 Ok friends...have a Happy Wednesday and watch those pins!
Nadine
Subscribe to:
Posts (Atom)


